


With more than 20 years of experience in the world of photography, Staff Pro Antonio Liebana is one of the most prolific wildlife photographers in Spain. Check out what he has to say about his work, the gear he uses as well as his favorite locations.
How do you prepare for a safari in Africa?
A safari to Africa works like any photography project. You have to plan and document the best times and places, in order to be able to photograph what you want. Despite trying to carry everything as tight as possible, something unforeseen can arise at any trip. Be forewarned that everything can change in seconds and be prepared for the unexpected is the best attitude.
Why Africa?
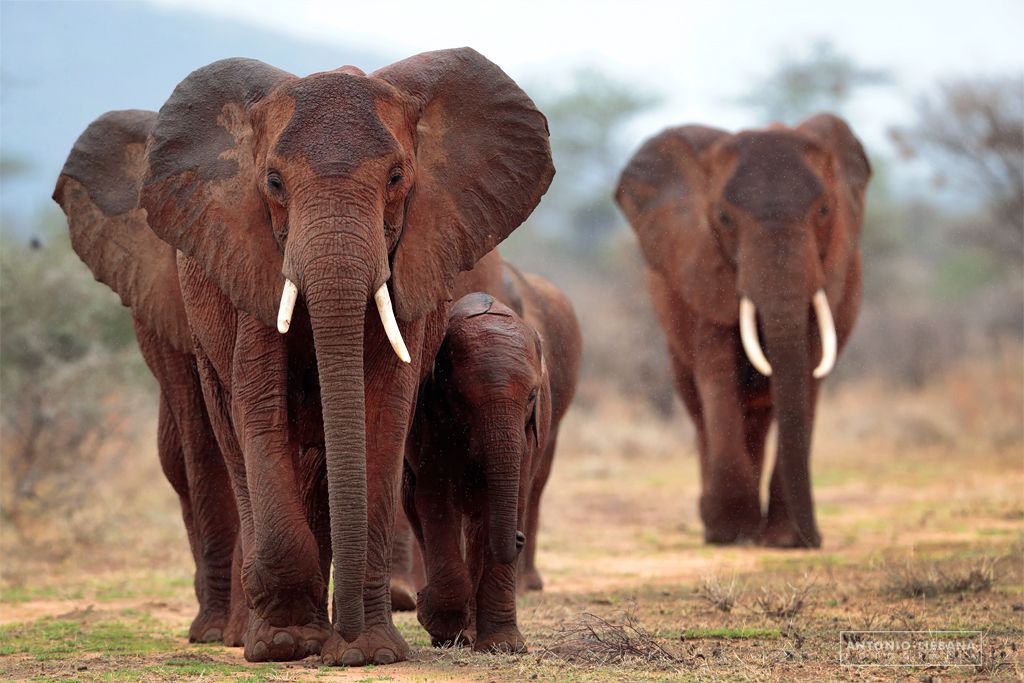
Africa is a magical continent and one of the last bastions of wildlife where you can find large mammals living as they have been doing for thousands of years. You can still see the great migrations of mammals and the wild day to day. In that environment, surviving next day is one of the biggest goals.

After so many trips, what was your main objective on this trip?
Finding new challenges, after more than 20 trips, is not easy. You are always trying to improve the images of previous trips. This is how new situations arise and you live moments in the wild that you may never live again. On this trip, the main objective was to photograph leopards lurking in search for food. It is an animal that is usually quite inactive and I wanted to try to get images of the leopard completely crouched looking for food with a stealthy attitude. It was one of the images that I lacked for a monographic article on the leopard.
Photographing from a car is not easy. How do you usually work?
After managing to locate and track the animals, then having luck that the light is good and that the subject is doing something interesting, there is no room for error in the photographer's methodology of work.
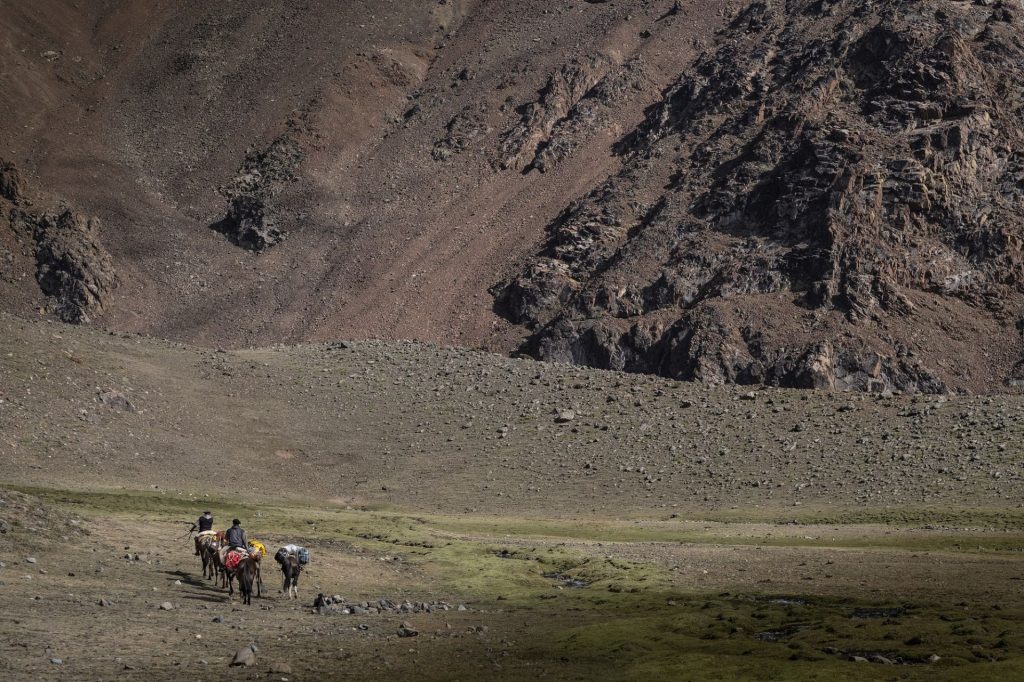
To photograph from a vehicle, you need not just to have everything as organized and close as possible, but also to have a quick access. In moments of action where every second counts, the time decreases quickly. At the same time, all accessories need to be protected from the dust and constant rattle of the 4x4. On the last safari, I incorporated two elements that have made the sessions easier- the Navin and the Harney Pouch for extra batteries, memory cards and multiplier (tele-converter).
I used the f-stop Harney Pouch, placed it right in front of my seat, this way I speed up everything significantly. I placed the extra camera body in the Navin. This way I freed up a lot of space in my reduced workspace.
Gustavo Cherro is a visual storyteller, and more than 20 years ago, he worked as a photojournalist in different newspapers, magazines, and agencies. Today he is choosing his own stories to develop. He always tries to have a human component in the project, and he usually prefers to work in natural environments, often sports or adventures and other times with a social and human component. These activities can be in mountains, boats, jungles, swamps or in a large city, although the latter, he always prefers to avoid it.
Words and images by Gustavo Cherro

f-stop: You are known for traveling to amazing places, and always being in the field. What was this adventure about?
Gustavo: The Cordón del Plata is the "high mountain" school of Mendoza in particular and Argentines in general. A short distance from Mendoza, Argentina (70 km) we have, in those mountains, one of the few relatively "alpine" landscapes of the country; Where altitude, really big mountains, ice, and verticality are combined. It is a midpoint between the great distances and desert softnesses of the high mountain of the Northwest and the concentrated and granite moles of Patagonia.
Due to the wide range of the assignment, I decided to go alone, to have the necessary times and not keep in mind that someone was waiting for me. I wanted to show the full beauty the place, its geography, flora, and fauna
f-stop: What was your biggest challenge during the adventure, and how you overcame those challenges?
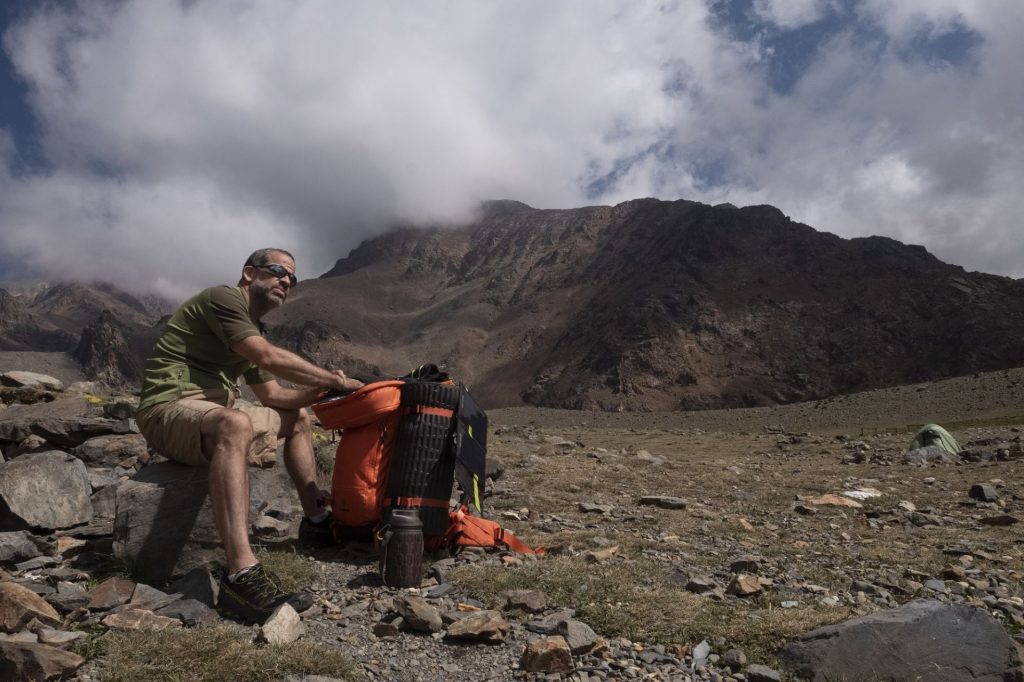
Gustavo: The aggressive weather, the height, the great distances, the cold night and its actions on the batteries of my gear and the transfer of all my equipment With respect to the weather, it is important to have the necessary equipment and knowledge, being poorly dressed can be a serious problem, the same happens during the hours of rest and cooking. The height can only be assimilated with the appropriate periods of acclimatization, sleeping, and living over 3000 meters requires that the body gets used to that and it is necessary to take the necessary time. Walking the necessary distances to take the right picture, require only training and patience, and the transfer of my equipment, in this type of exits, I entrust it to my f-stop Sukha. It is spacious, comfortable and safe.
I practice mountaineering from a young age, and I have been working on images in these conditions for many years, but every time I see myself face to face with the mountain, she teaches me how small I am, how small the problems are that I daily They seem huge and all of them are solved with a better point of view and that to avoid problems, we just have to get away from them.


f-stop: Can you remember some of the best moments of the adventure?
Gustavo: I think seeing the wild birds of the place not fearing me and eating centimeters of me was one of those great moments. One afternoon, a young woman appeared with a baby in her arms near the camp, without a backpack, without a tent, without any equipment, left her 2-year-old baby (calculation) and started practicing Yoga, she did it for a while and then disappeared again.

f-stop: For the people that plan to visit Cordon del Plata, can you share some tips and tricks?
Gustavo: Try to travel with the least amount of equipment possible, only strictly necessary, wear the right clothes so that when the worst weather forecast happens, there is nothing left in the backpack to put on, the sleeping bag should be the best you can carry, It is the only space and moment that will give you warmth and rest. Never be alone on the mountain without communication with the outside, always have elements that serve to warn of a problem. Always protect your batteries with the heat of your body, even at night. Drink a lot of liquid and give your body the "necessary" time so that it does not suffer with height
You can find Gustavo's work on his Instagram and Facebook.
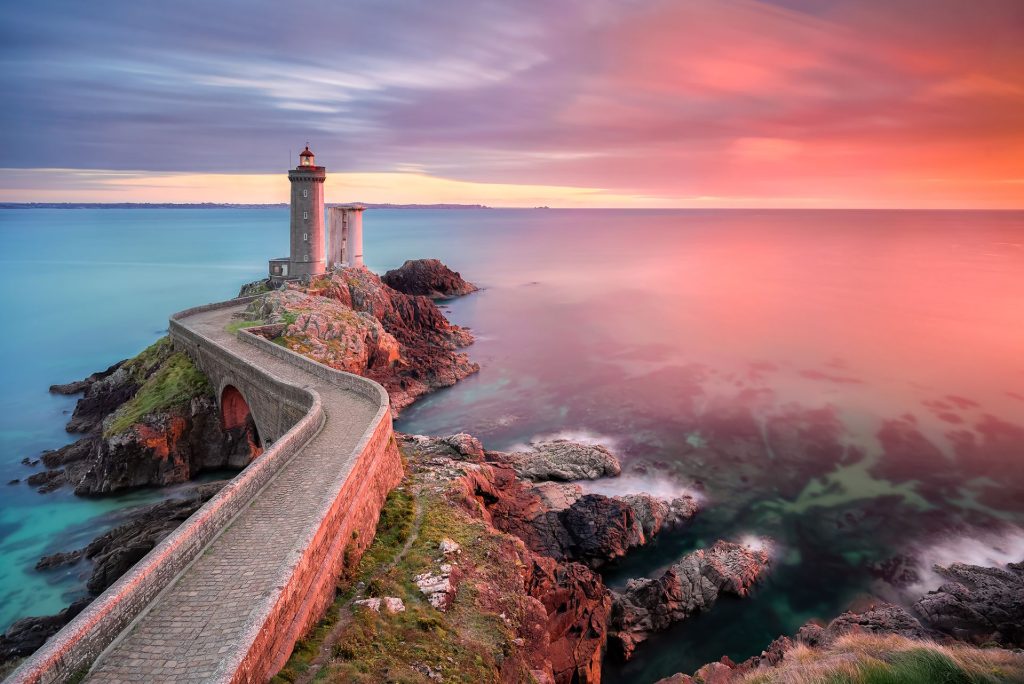
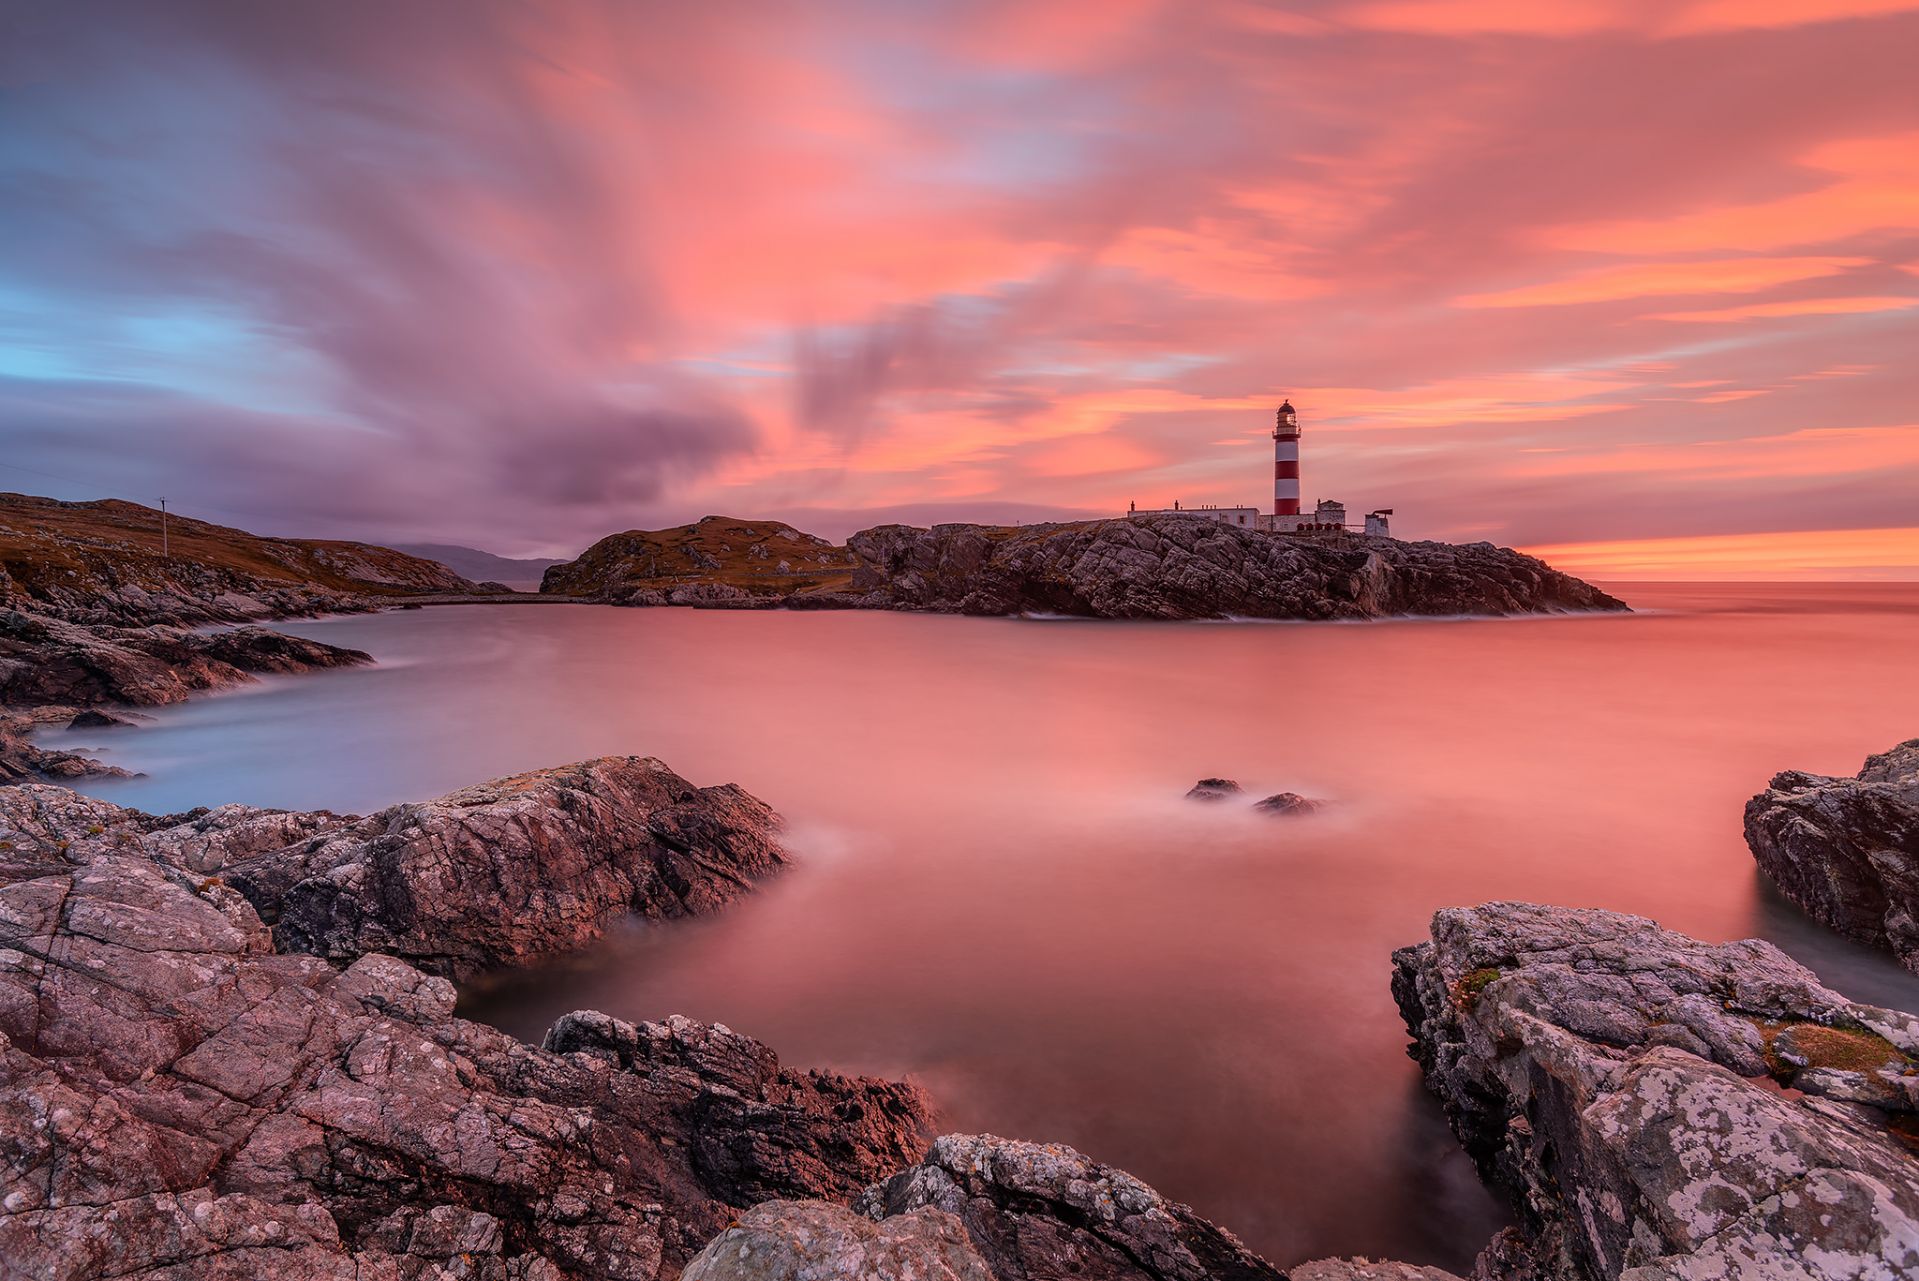
1.PLAN YOUR SHOT
The first element you need to capture a colored seascape is a nice location.
You can maximize the chances to frame something great if you know in advance where the sun will be at sunrise or sunset, according to the moment you decided to capture the image. As sun position can be accurately predicted, you can decide your location and composition well in advance. Pro tip: use an application like PhotoPills!

2. CHECK THE WEATHER
A great location and a perfect composition is not enough if the light is not on your side. For this reason, weather can play a decisive role.
To maximize the chances of a colorful sunset or sunrise, you will need some clouds in the sky. A great way to understand how the situation is going to evolve is to take advantage of technology using some Apps. My favorite one is Windy that let me track not only the cloud coverage but also the direction where they are moving!
3. GO WIDE!
When the sky starts to lit you’ll want to capture all the marvelous light around you. For this reason, I suggest you use a focal length between 14mm and 21mm. Moreover in a seascape image a wide angle lens will let you get more details in the scene, allowing for example to capture at the same time the beautiful clouds and their reflections in the sea.

4. USE A TRIPOD
At sunset and sunrise light conditions may require you to extend the shutter speed. In order to avoid blurry shots I recommend the use of a tripod. While the camera is on the tripod remember to deactivate on your lens or on your camera body the anti vibration mechanism otherwise the risk is that you’ll get a blurry shot anyway. If you're shooting with a DSLR use also the mirror lock up function: you will reduce even more the chances of not having a super sharp shot!

5. USE FILTERS
Your eyes see much more details than your camera as they have a better dynamic range. For this reason if you want to capture the colored details in both the bright areas and the dark ones of the scene, use Graduated Neutral Density (GND) filters: they will work like sunglasses for your camera! Another great filter is the Polarizer: it will let you to remove reflections on the surfaces, the haze effect in the sky and to naturally saturate the scene. But be careful: if you remove the reflection from the water, all the nice color of the sunrise or sunset will be gone!

1. THINK FAST, BUT BE PATIENT
Do not panic if before the first jumps do not get good results, your mind and ability will understand the athlete's times and as the day progresses, everything will improve. Do not hurry
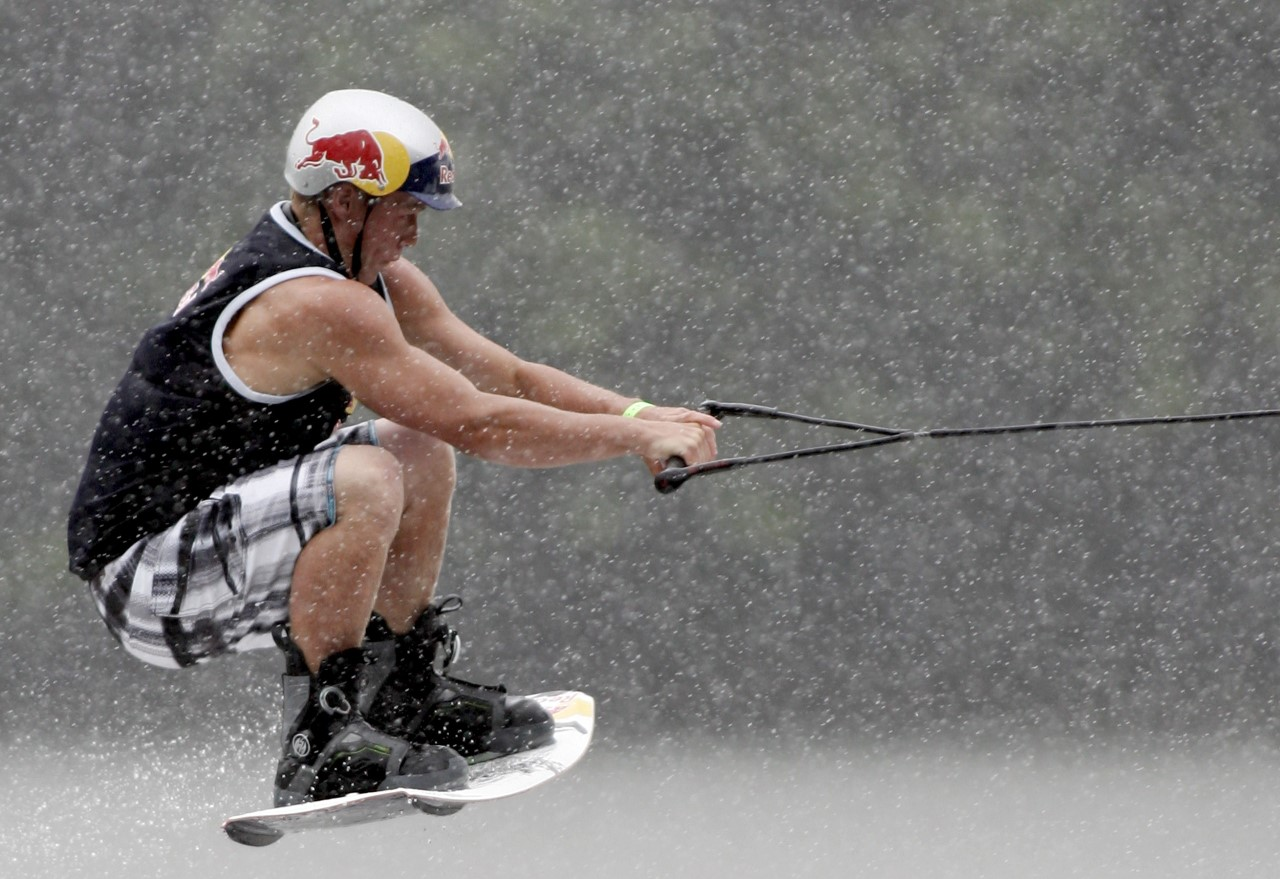
2. UNDERSTAND THE ACTIVITY
Try to meet the athlete, observe his movements and learn about him, if possible, interact with him and deepen that knowledge. This will help you get better results.
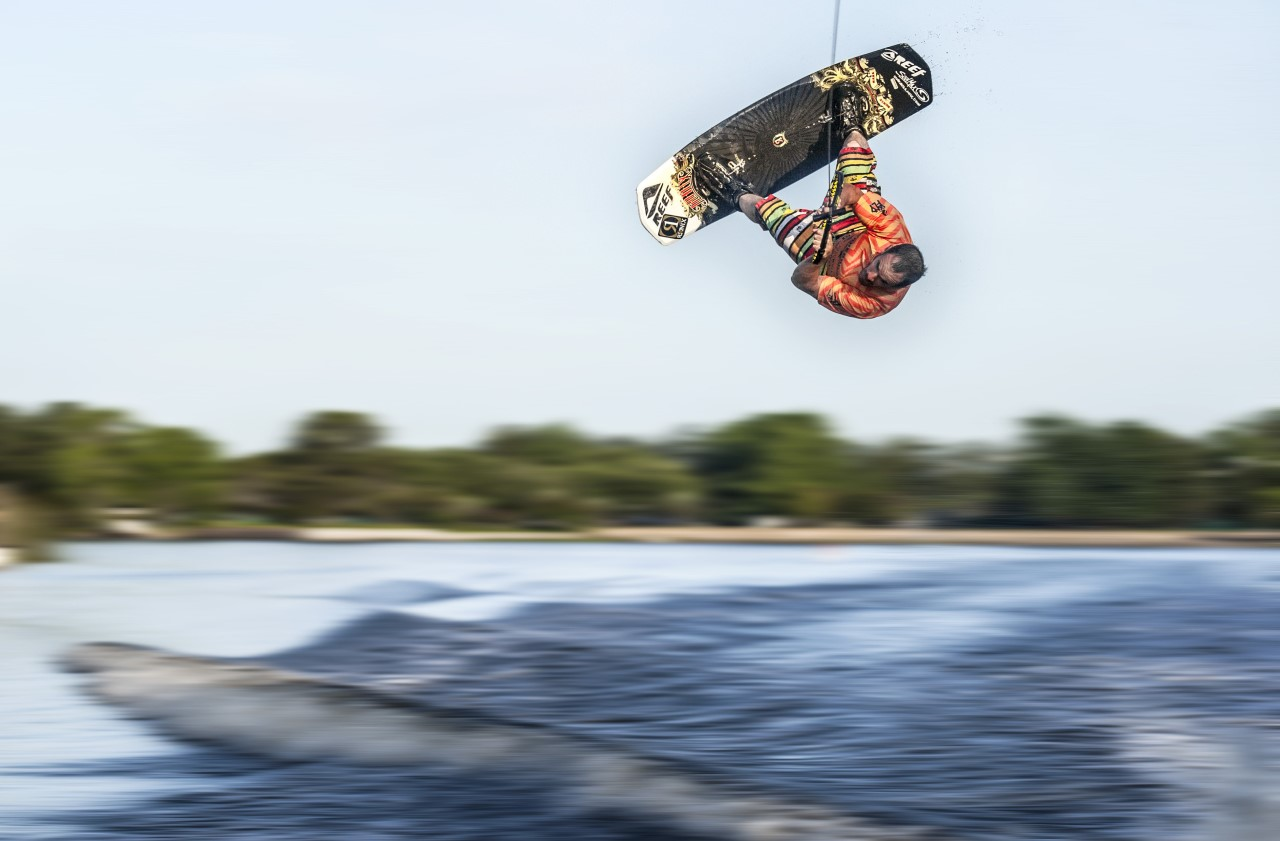
3. THE BACKGROUND
A stunning background can transform a simple photo into one that is extraordinary. Take advantage and be "ironic" with the environment, a rider running out of his environment will always impact more visually.
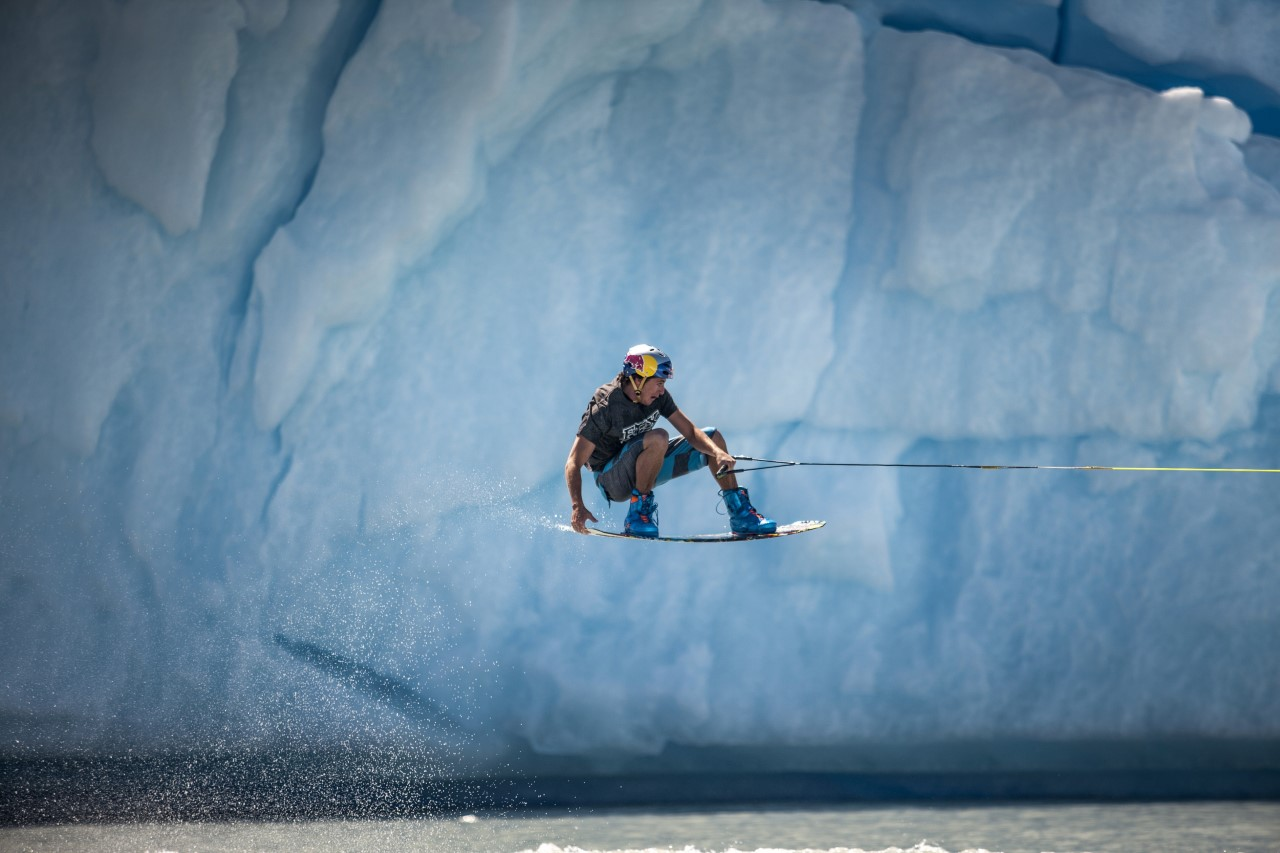
4. MAKE UP THE IMAGE
Is one of the most important aspects of a photograph, the composition of an image is what makes it great. Many times the place of the shot is predictable, and this allows us to preview and compose in our mind the image before it happens.
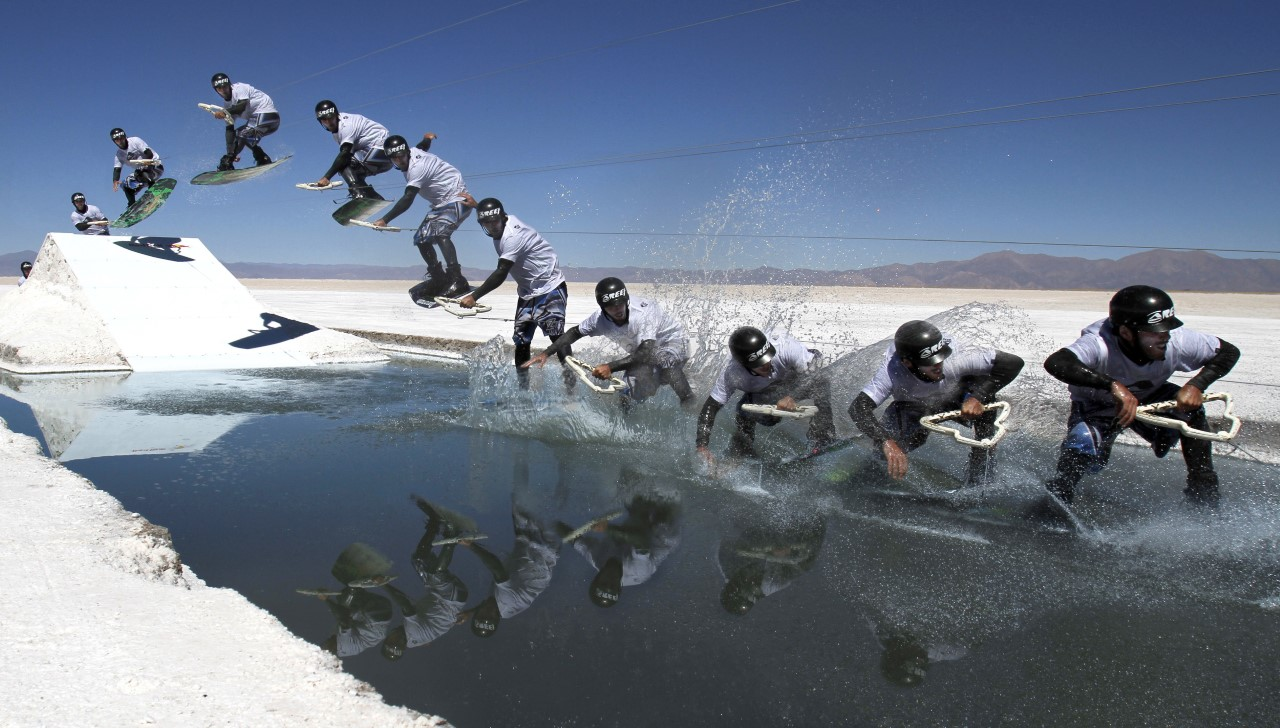
5.ANGLES
The best way to get cool and different pictures is to get out of the boat and shoot from a different places. from land, from some jump ramp, from some high point, even from inside the water.


6. TECHNICAL RESOURCES
Try to vary resources and techniques when photographing, use low speeds, make half screens, make sequences, choose different lenses.

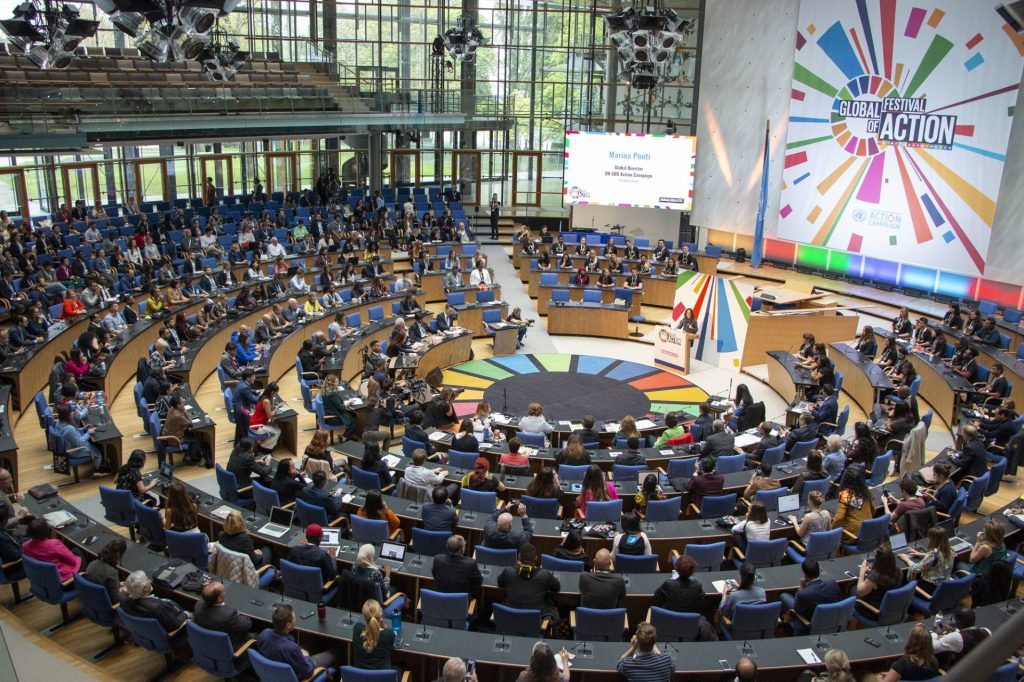
In early May 2019 the United Nations held its Global Festival of Action in Bonn, Germany, to encourage its Sustainable Development Goals (SDGs) and to celebrate the progress that has been made. As part of this festival, Canon sponsored a multi-day visual storytelling workshop through its Young People Programme. The workshop was led by Canon ambassador and f-stop ICON Ulla Lohmann. We learned more about the workshop from Emma Hope, Sustainability Manager at Canon, and Ulla.
How did you learn about the UN’s Sustainable Development Goals and its Global Festival of Action? What inspired you to get involved?
Ulla – I was inspired by the Sustainable Development Goals when I was studying natural resource development in Australia. I was excited when Canon asked me to help teach visual storytelling to participants of the UN’s Global Festival of Action. For 2018, and again this year, we decided to involve Canon’s Young People Programme in the visual storytelling workshop.

What was your role, and did you have a goal before you started?
Ulla – My role in the workshop was to help the students improve their visual storytelling skills and to inspire them to continue creating stories after the workshop ended. Our goal was to produce a body of work that would tell stories of sustainable development through the eyes of a younger generation.
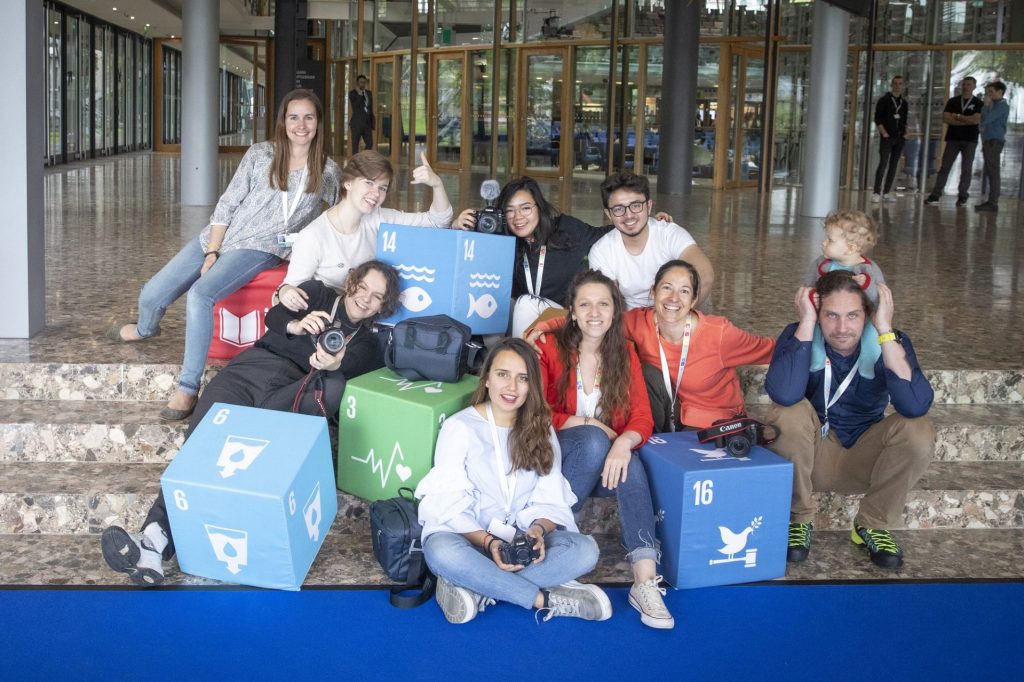
How many students were there and how did they get involved?
Ulla and Emma – The students were previous participants of Canon’s Young People Programme. All five of them were high school students from Germany and Belgium whom we had already worked with in 2017, 2018, and 2019. When possible, we try to provide follow-up opportunities like this to the participants, as the programme’s focus is to provide quality education and to help the generation of tomorrow harness the power of positive visual storytelling to drive change.

Where did this event take place? What did you and the participants work on? What equipment did the students use?
Ulla – The Global Festival of Action took place at the Bundestag in Bonn, Germany. This is a historical location for me, as I remember watching parliamentary sessions there when I was a child. The students worked in three groups to tell their stories in three methods. One group worked on a video, the second group worked on Instagram, and the third group worked with still images, in the manner of photo reportage. Canon donated cameras for the students to use and f-stop donated camera bags.

Did you and the participants face any challenges? If so, how did you all overcome those challenges?
Ulla – The biggest challenge was the short amount of time we had to complete and present the projects. We had to do the training, briefing, gather material for the stories, edit them, and deliver them during the festival, which was May 2-4. In the end, we managed to do all of that. The students were successful. I was very proud of them.

In what ways did the students learn and grow through this experience?
Ulla – The students already had a good idea of how a picture can tell a story. During this workshop they were able to practice what they already knew and use the new skills they learned during the workshop. They also got to work with other people their age to tell stories about issues they care about.

What did you learn from the students? How did the students inspire you?
Ulla – The students are really enthusiastic about making the world better. It was really infectious. They are very curious about the world around them and they were always asking why things are the way they are and how they can be better. I am grateful that my job allows me to be curious, ask questions, and be enthusiastic. The students reminded me how important this is. I hope the workshop we did together helps them realize that they can become storytellers in their own ways. It is all about inspiring each other.
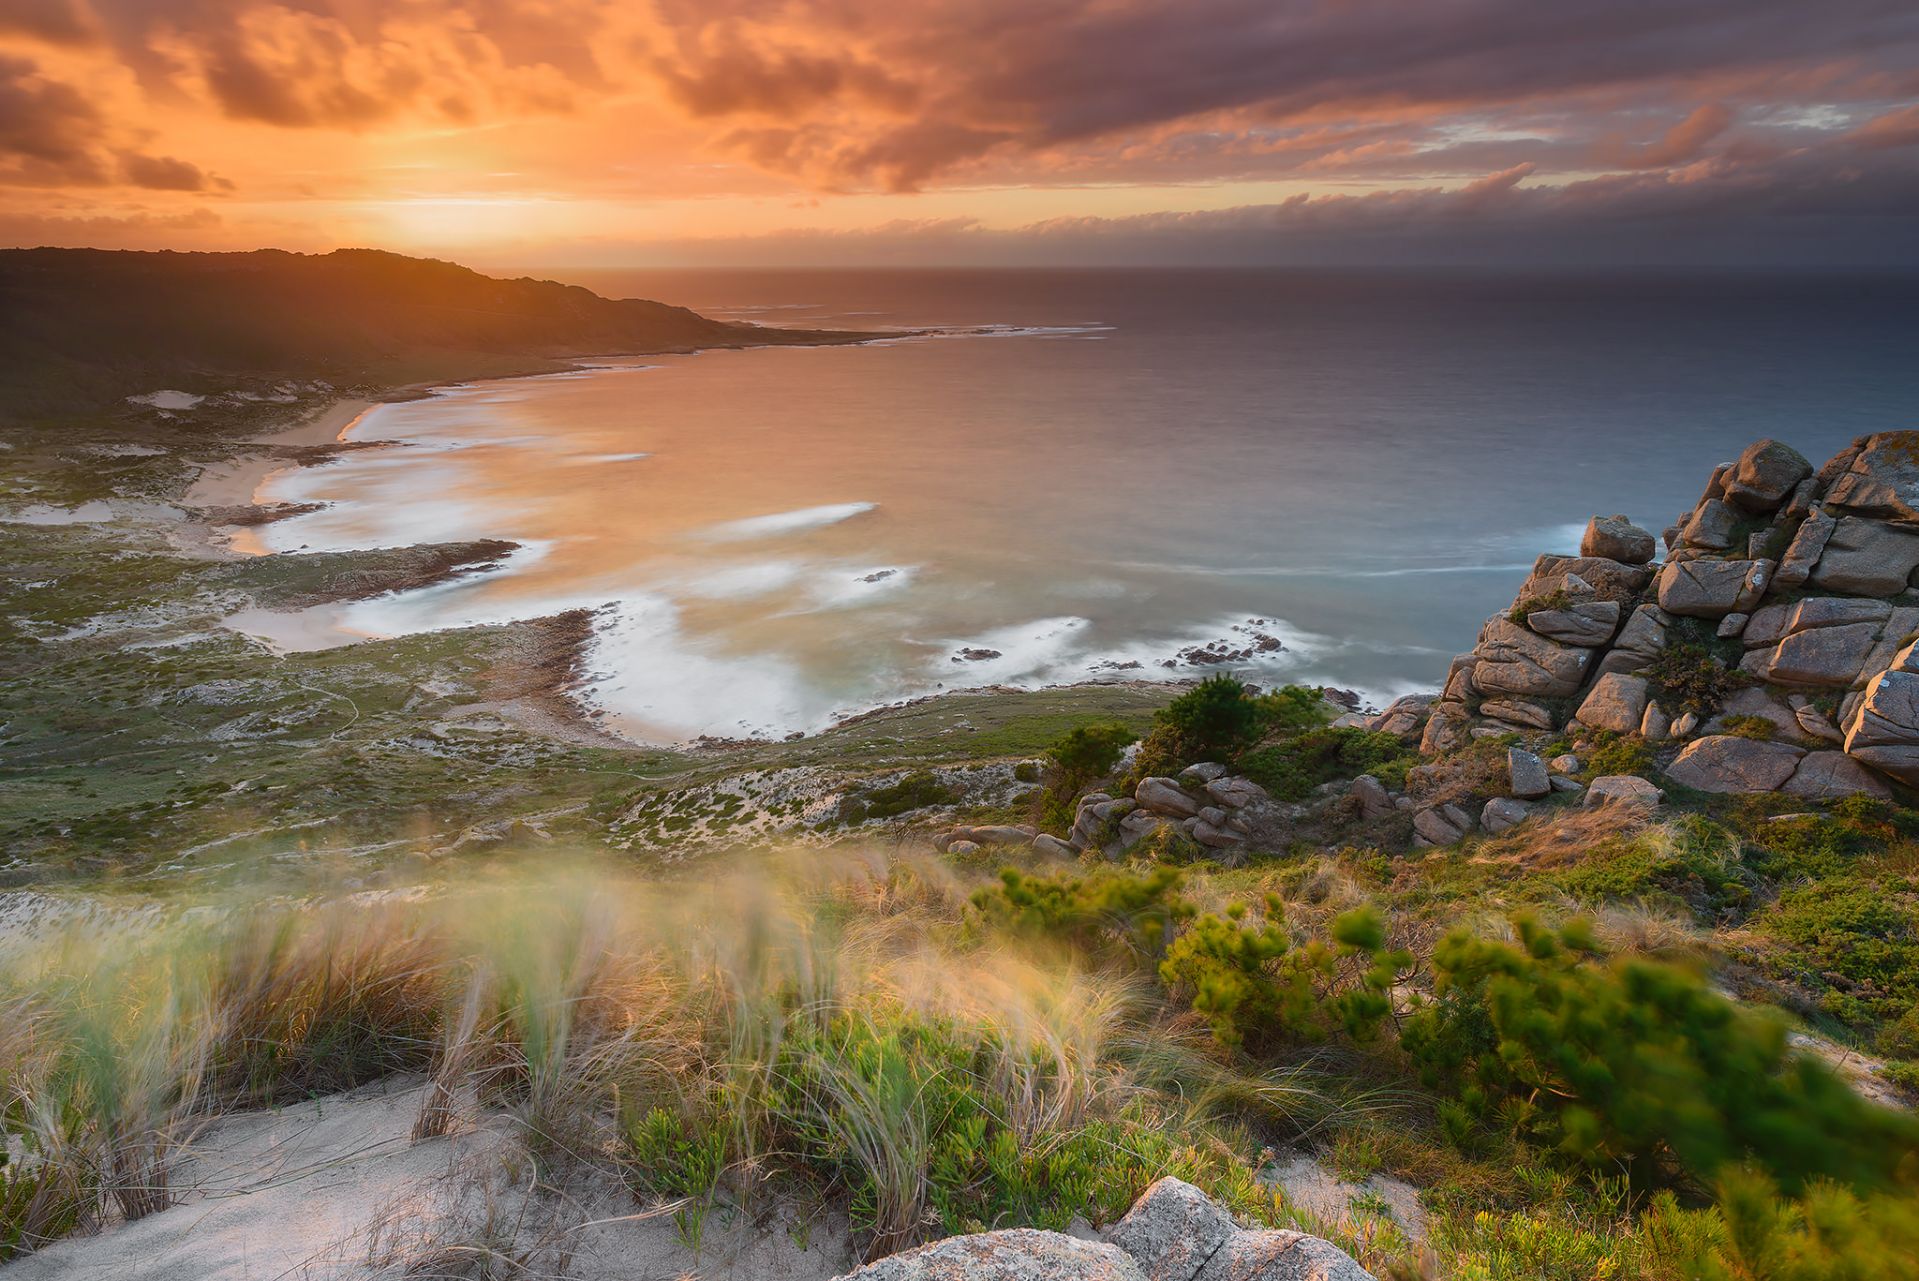
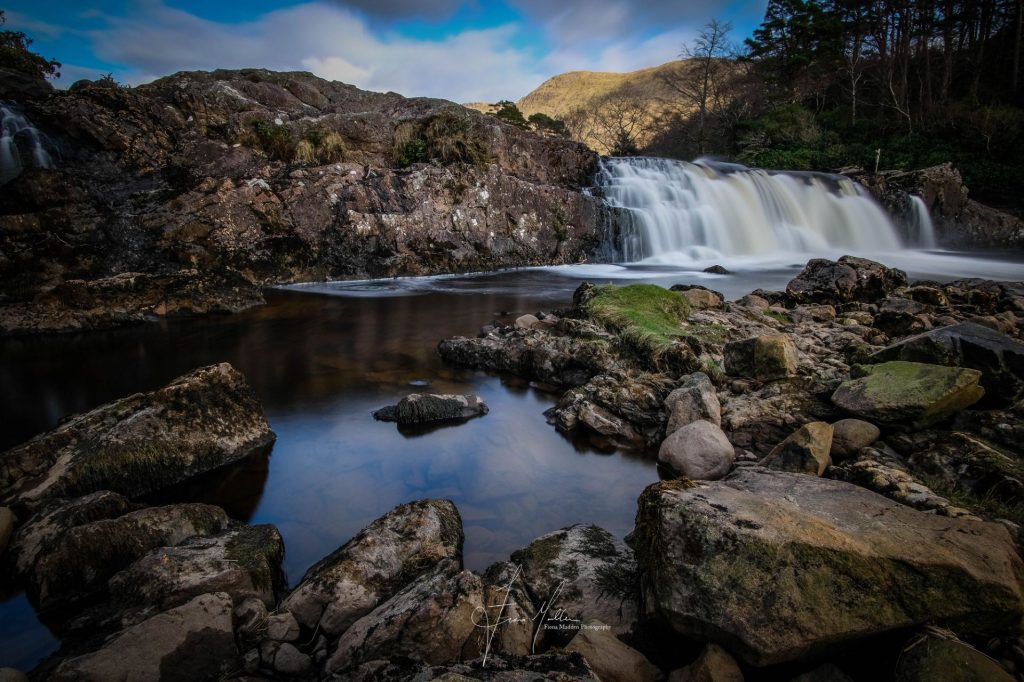
We all long for that beautiful landscape shot that looks like time is standing still, rough water turned glassy and skies that look painted. This is all possible though a 10 stop Neutral Density filter. Kinda like massive thick sunglasses for your camera so you can leave the shutter open for long periods of time. All you need then is a decent tripod and some scenery!
1. SUPER WIDE SCENERY
Mainly I take landscapes with Fujifilm's super wide 10-24mm. The more landscape you can fit into these images the better. You can start by looking for good detail in rocks, or interesting foreground, or anything that water will move around. Remember when water has places to go it will create such interesting patterns when the shutter is open for so long. Even the most simple and basic photos can turn into colourful in depth beauty that nature provides with moving water.

2. MOVING WATER
Any type of fast or slow moving water can look stunning on a long exposure. With fast moving ocean water you will get the white wash patterns where the waves breaks around the feature. With slow moving water, the entire image looks like it turns into glass. Win win either way, so it means you can shoot in almost any conditions!

3. GREAT CLOUDS
Clouds can add so much detail to a long exposure shot. Especially if they are moving in any way fast. Some of the best sunset photos I've taken, had fast moving pink fluffies, leaving streaks of colour and painted brush strokes behind them. Cloud detail isn't essential but you can see how much it adds to make a truly dynamic photo. If the sky is still too bright to slow down the water that much, consider getting a graduated filter for the sky or if you don't have one, you can bracket 3 shots into one for a merged, perfectly exposed photo.

4. FIND A HUMAN
If you have a friend who can stand really still (bet you never thought that was a useful character trait) you must borrow them. If they can stand still, in a world of everything else that is moving you will strike the viewers interest. Bare feet, down at the beach as the water moves around them, or on a cliff edge as rough water surges below. Anything that looks dramatic, while the subject stays still would create a really interesting photo! Have fun!
5. BONUS TIP
Making sure that expensive piece of thick glass is spotless before sliding it into it's holder seems obvious but hey! A rocket duster between shots or a quick check on the glass will save work later in photoshop. If it's really windy, you can weigh the tripod down with Wait until you think it's almost too dark to shoot and then take your shot...ISO as low as possible!

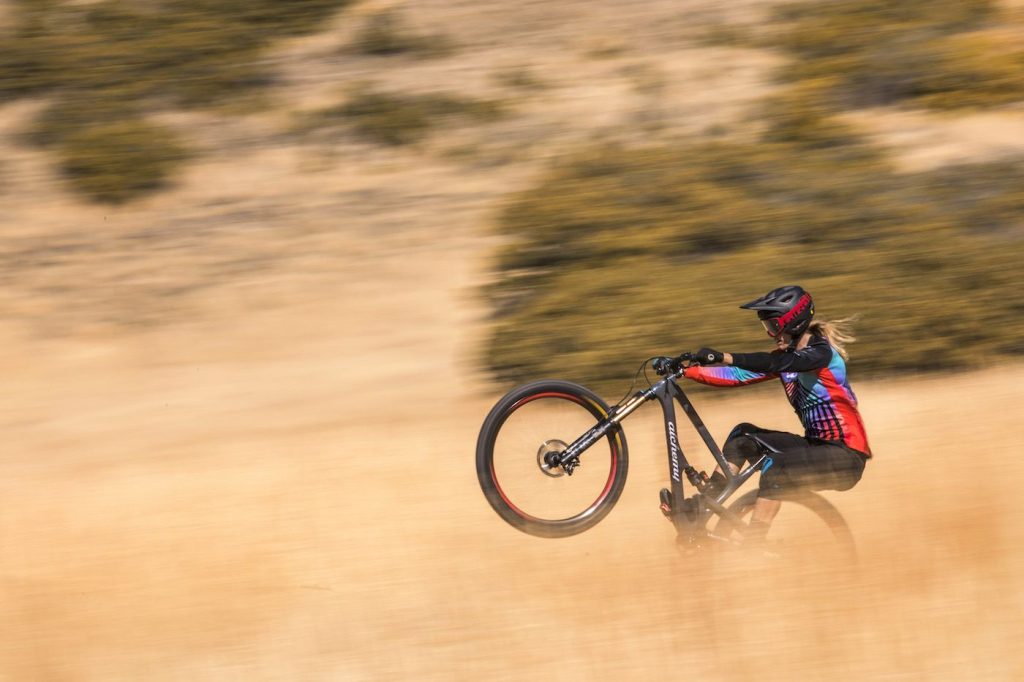
1. SHOOTING IN THE TREES
One of the challenges of mountain bike photography is shooting in the trees, especially on a sunny day where extreme hot spots, splotchy shadows, and harsh contrast can be difficult to work with. But every challenge is a creative opportunity, and there are a few ways you can use this harsh light to create great images. One method is to look for backlit areas where the sun is behind the rider and set your exposure for the shadows. If the image looks too bright on your screen, adjust the exposure down until you find the right balance where the rider looks good and the foliage is lit up, creating nice highlights in your image.

2. GET CLOSE!
Unlike the warning on your car’s side-view mirror, “objects in mirror are closer than they appear”, the opposite is true with photography. When you’re shooting, your eye naturally focuses on the subject and often misses what’s happening on the edges of your frame, and sometimes a great action shot can get lost in the distracting stuff around it. To overcome this natural tendency for tunnel vision, either move in closer or zoom in tighter. It may seem too close for comfort, but once you get used to it, you’ll be able to capture more dynamic and engaging action images.

3. CREATIVE PERSPECTIVE
Finding new and interesting perspectives is a creative challenge for every photographer. One technique I’ve found that consistently produces results is to use foreground elements to add perspective and depth to my compositions. Look for rocks, trees, leaves, and other objects that you can use to frame your composition around the rider. With your lens focused on the rider, these foreground elements add depth and perspective to your composition and lead your eye to the action in the background.
4. THE PAN BLUR
The pan blur is a staple in every sports photographer’s bag of tricks. The concept is simple. Set a slow shutter speed on your camera, 1/30 sec is a good guideline, adjust your ISO and aperture for correct exposure, and follow the subject as they move past you, giving the image a sense of motion. The challenge is to follow the rider precisely so that they’re sharp in the image against a blurred background. For better results, use one of the focus points in your viewfinder to track the rider, follow them through the entire sequence, even after you’ve stopped shooting and breathe out steadily as you shoot to keep your body relaxed and the motion smooth and consistent.
5. KEEP IT FUN!
One of the keys to being a successful photographer is developing a good rapport with the riders. No matter how hard the shoot is or how long we’re out on the trail, I want everyone to enjoy the experience. Keep the communication open, take the time to explain to the riders what you want to achieve and get their feedback on your ideas. If they’re part of the creative process and everyone is on the same page, your chances of success go way up. And remember, mountain biking is fun! The more fun you have on a shoot, the more it’s going to show in your images!.
1. LIGHTING IS THE KEY!
Make sure to have good lighting while you are making portraiture. The light can be natural (ambient) light or artificial light. It all depends on how you want the end product to look.

2. GET THE RIGHT BACKGROUND
The background can change the mood of the photo, so make sure to have it right.
A white background is a good start, or you can create your own background pattern by adding shadows that fall on the background. Another option is to let the shadows be a foreground pattern that fall on the model.

3. SEQUENCE SHOTS
Take sequence shots to show the personality of the model.
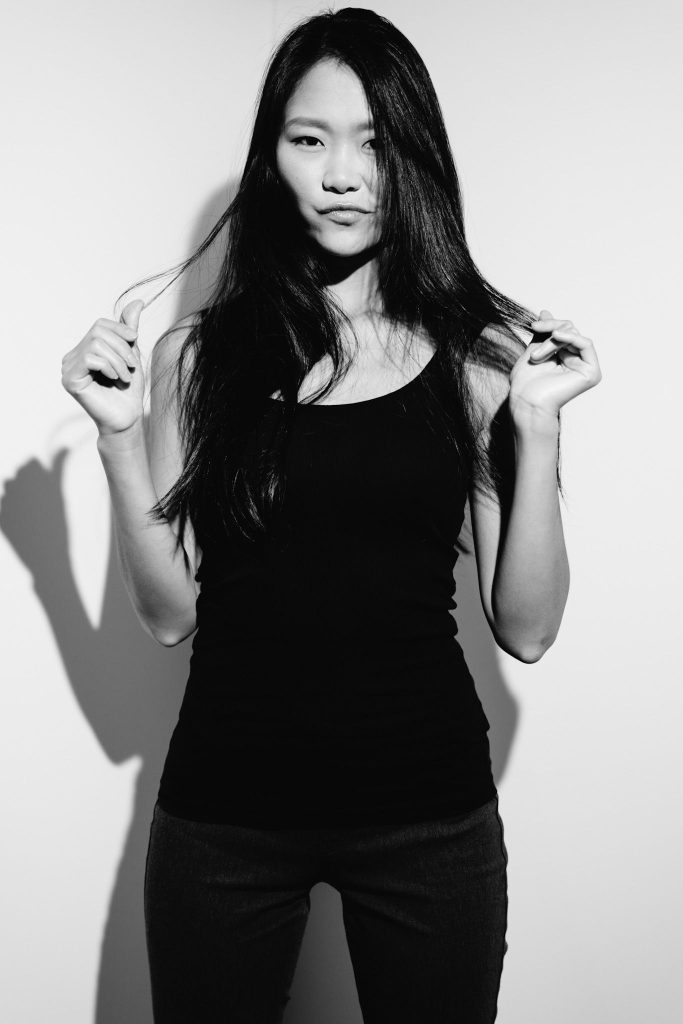

4. FOCUS ON THE EYE THAT IS CLOSER TO THE CAMERA
This will make the eyes stand out. Also, focusing on the nearest eye will keep the "out of focus area" behind the point of focus.


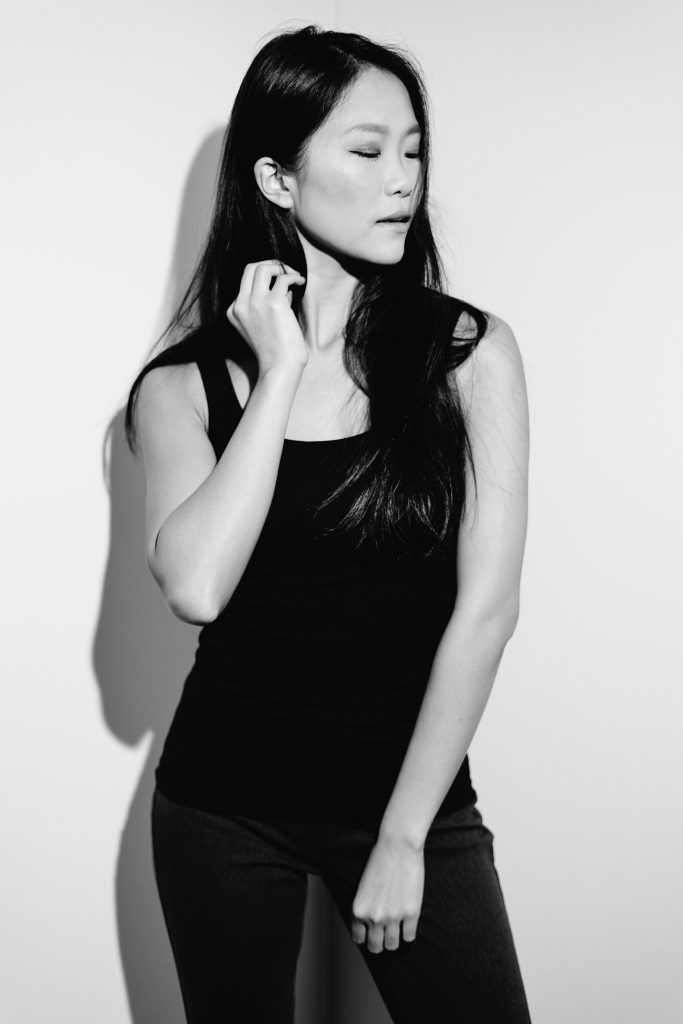
Henry CK is an artist, photographer, and filmmaker based in Hong Kong. He has been attracted to photography since childhood and taught himself to be a professional photographer through self-mentorship. Henry CK specializes in the music and entertainment industry, creating images and videos for emerging artists, bands, and musicians.
f-stop Ambassador Matthew Vandeputte (@Matjoez) is a timelapse photographer and YouTuber who specializes in the 'niche within a niche' called hyperlapse photography. Creating this unique engaging content started as a hobby which got out of hand, and now he is commissioned by brands to create timelapse videos, and has written two e-books on how you can do this yourself.

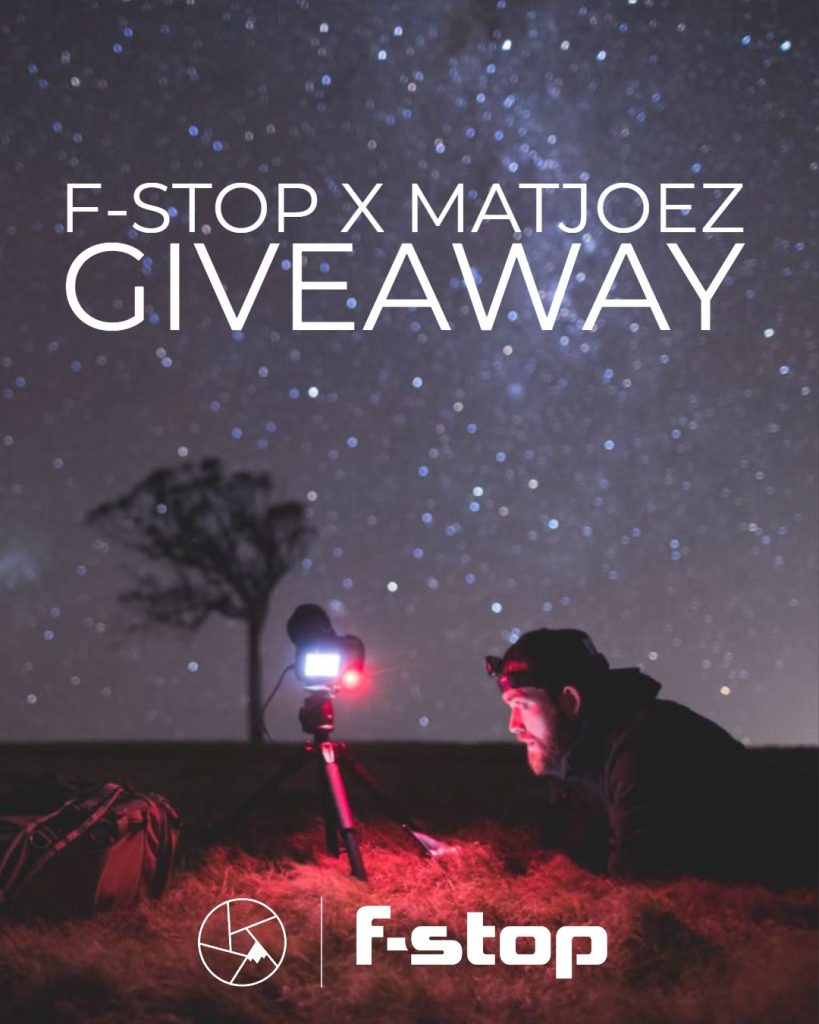
To celebrate this and spread the knowledge, we are giving away both e-book guides to timelapse and astro photography, and a Dalston pack. But before you enter the giveaway, here are 5 tips from Matthew to improve your timelapse photography and a look inside his bag...
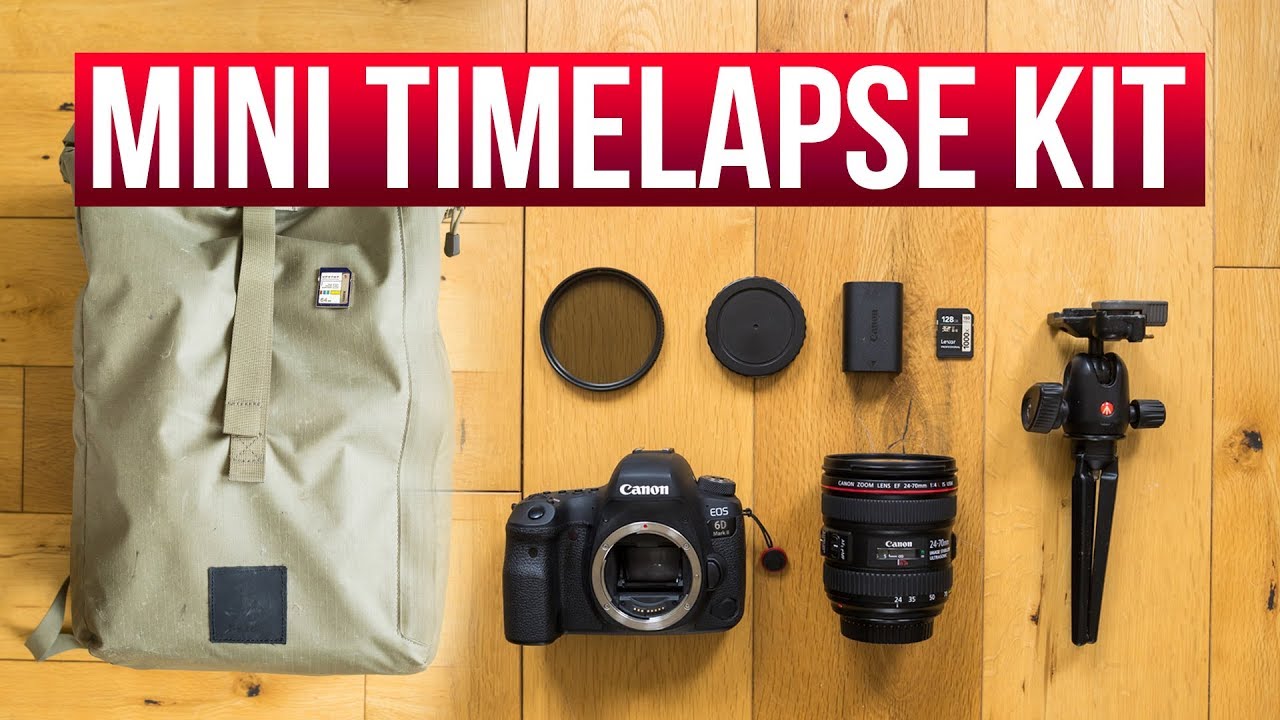
This may seem simple, but seriously spend a bit of extra money on a tripod that won’t be wobbly or shake around in the wind. It saves you so much time in post production from stabilizing. It is always better to get it right in camera. When you can't bring a large tripod, even a compact tripod can be stable.

Something that a lot of people don’t do, but it makes your footage look so much better, is use an ND filter to drag your shutter. So ideally when you are shooting with a 2 second interval, you shoot with 1 second exposure. Now most lenses don’t stop down enough to get that shutter drag, or that extended exposure, so you are going to want to put a ND filter on your lens to make sure you have the cinematic looking footage.

If you are using stabilization in your lens or camera, make sure to turn it off, because if your lens has a stabilizer and it is on a tripod, it will actually hunt that motion that is not there, and your footage will wobble. I know it’s counter intuitive, but anytime you put your camera on a tripod, turn off your image stabilization
If you live in a PAL country where video broadcast is twenty five frames per second, you want to shoot at 250 photos minimum per sequence, whereas if you live in a country like the USA (NTSC video broadcast) you want to shoot 300 photos minimum per sequence, because that gives you at 30 frames per second, 10 seconds of video and I call that the bare minimum for a nice timelapse shot.
GET LUCKY: ENTER TO WIN @MATJOEZ'S NEWLY PUBLISHED GUIDES TO TIMELAPSE PHOTOGRAPHY AND ASTRO PHOTOGRAPHY, PLUS HIS FAVORITE f-stop DALSTON BAG HERE!

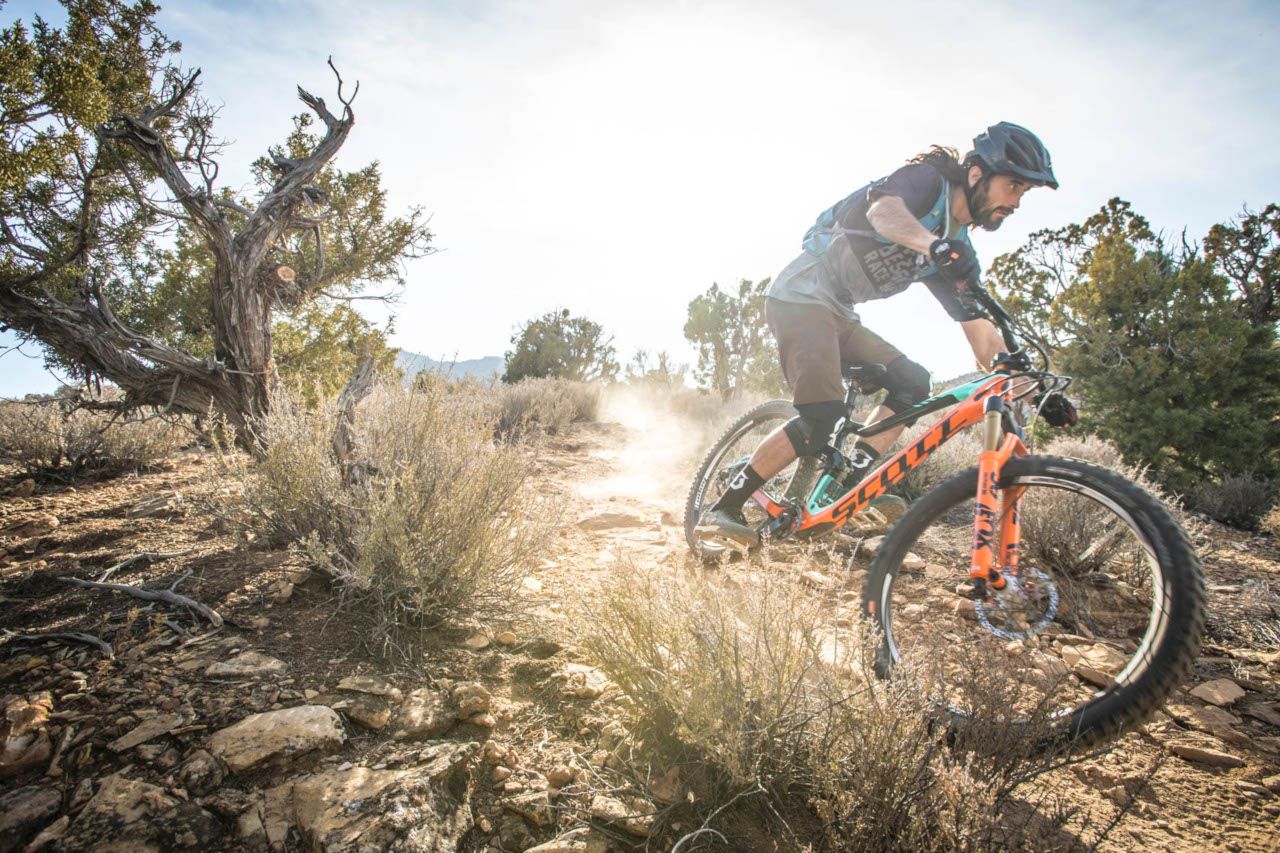
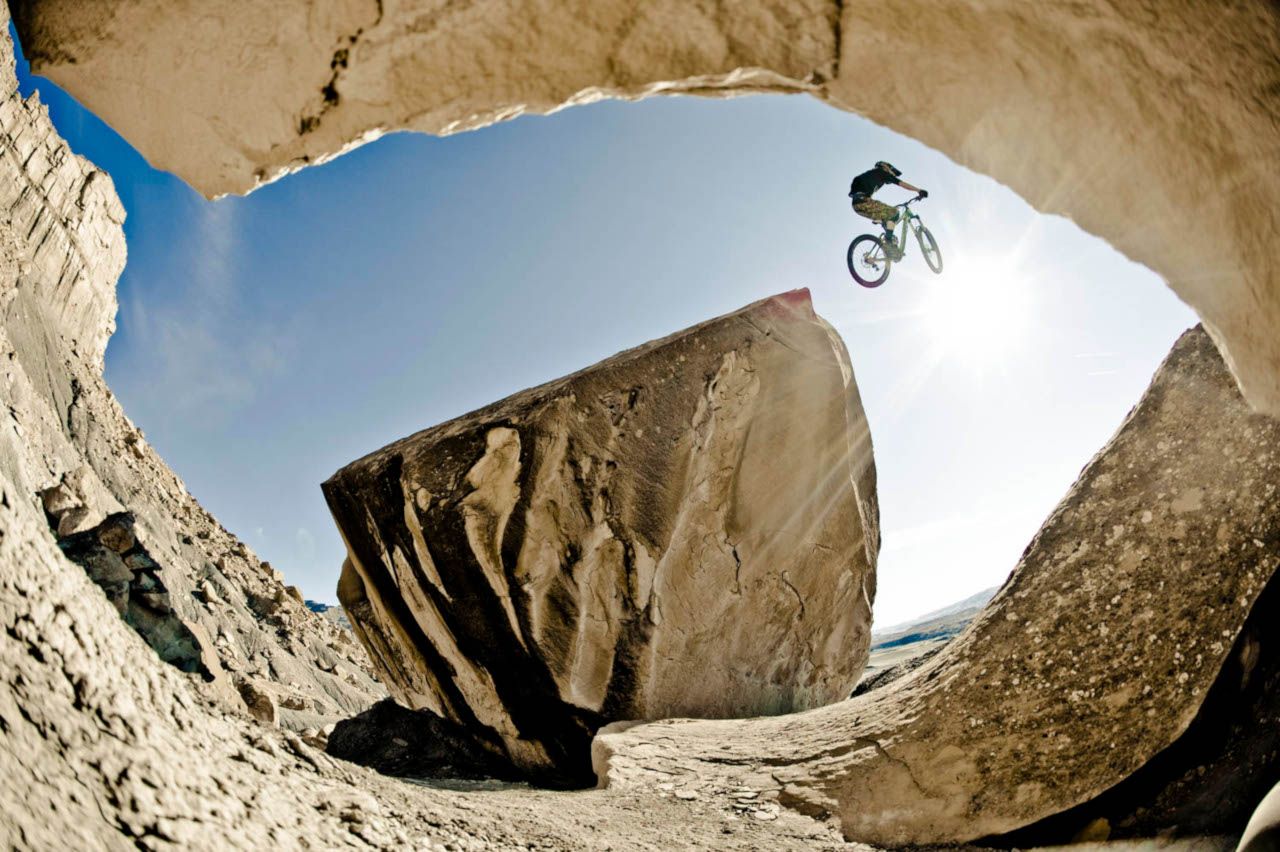
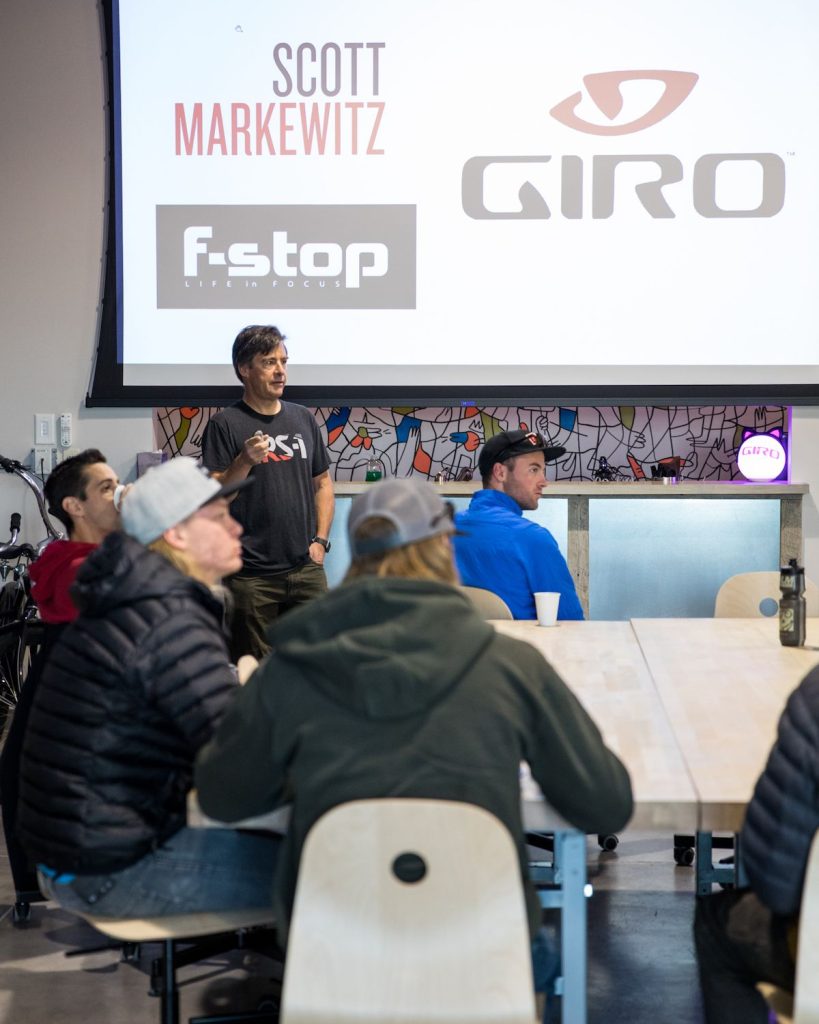
SHARING SINGLE TRACK VISION: BEHIND THE SCENES OF A MTB WORKSHOP WITH SCOTT MARKEWITZ
Scott Markewitz has been shooting mountainbiking all the way from it's renegade roots to the superhuman feats of Red Bull Rampage this year. His love for the sport and photographing it shines on, so Scott teamed up with mtb helmet and apparel brand, Giro to share that passion in a workshop with him - free of charge! Take a look behind the scenes with Scott at how this workshop came to life, and how the participants got hands on in Park City, Utah.
How it came together
The idea for this workshop started with a visit to the Giro office in Park City, Utah this summer. Giro was looking for community events to host in their office space, I suggested a photo workshop, they liked the idea and since Giro is the market leader in cycling helmets and Park City is a world class mountain bike destination, a mountain bike workshop was the obvious choice.
To get the word out we created a week long Instagram contest where anyone could enter by posting photos on their Instagram page and tagging #scottmarkewitzphotosession and #scottmarkewitzphotosessionutah. At the end of the week we selected 9 local winners to attend the workshop free of charge and one national winner to win an all expense paid trip to the workshop from anywhere in the US along with a complete Giro cycling kit, all compliments of Giro.
Workshop Time
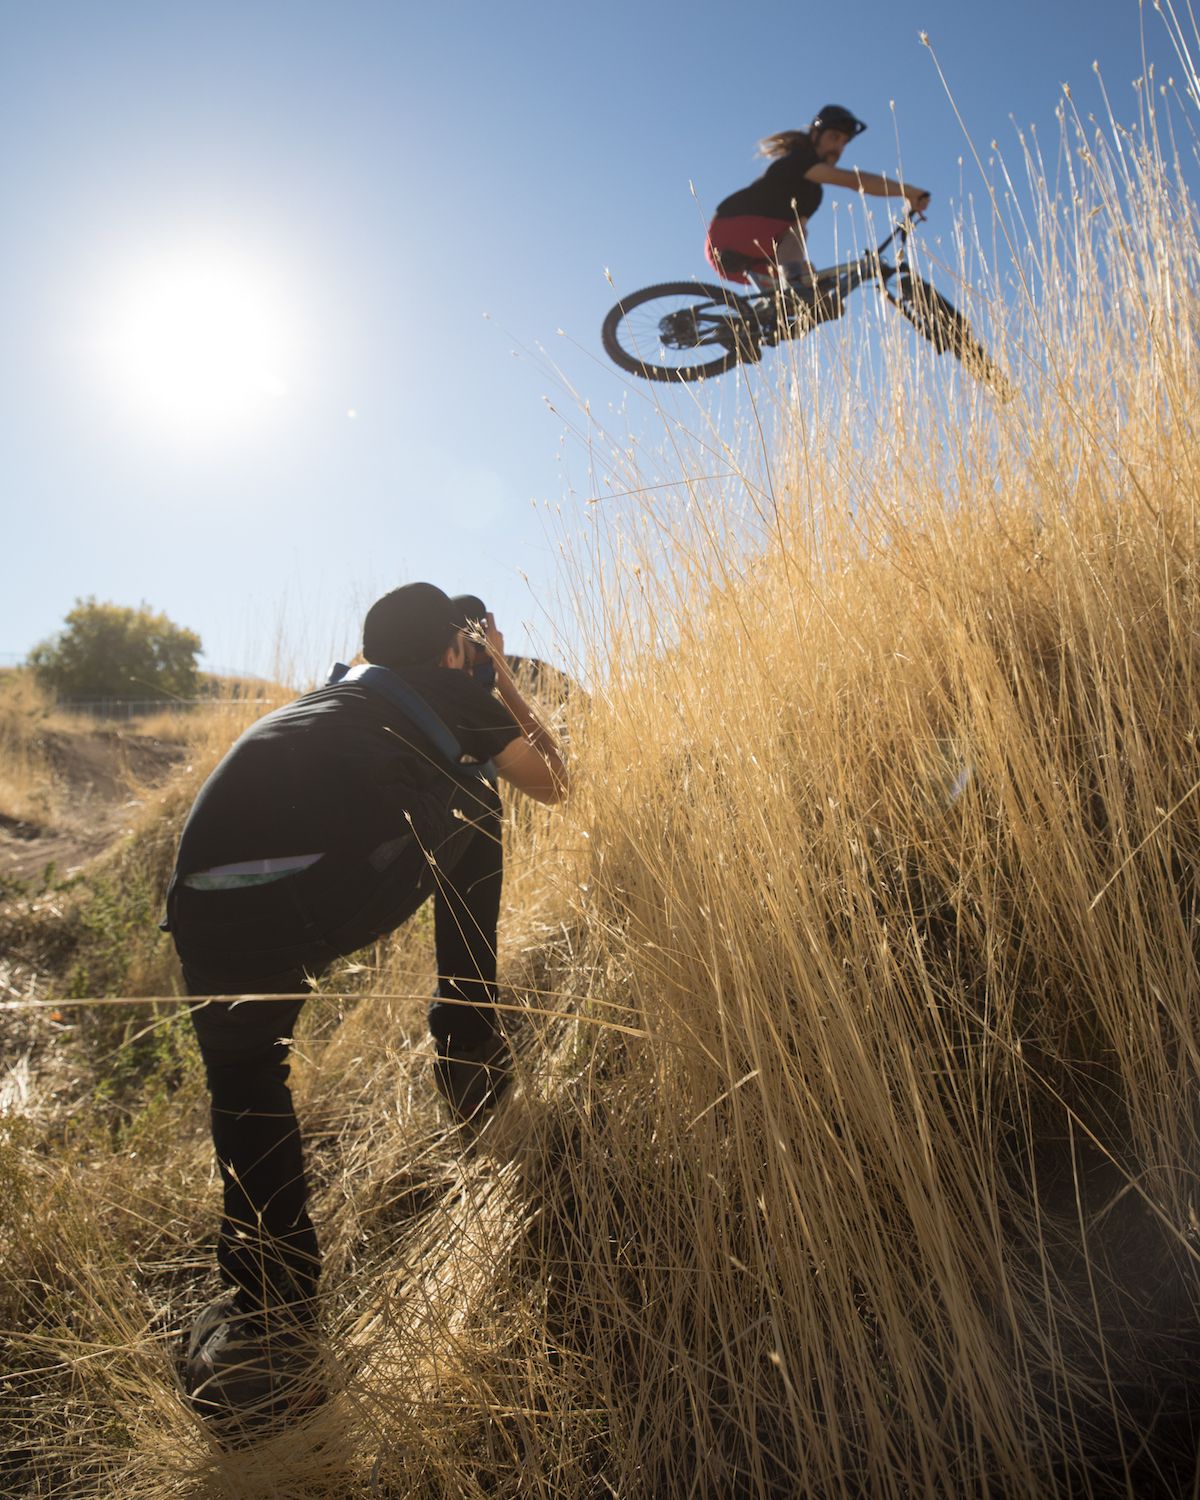
We met the group at the Giro office early on a crisp, clear fall morning. It had snowed in the mountains a few days earlier and covered most of the trails around Park City, so we made a last minute decision to take the group down to Salt Lake City, where it would be warmer and drier. After a quick meet and greet and a short presentation, we jumped in the vehicles and headed down to the I Street bike park in Salt Lake.
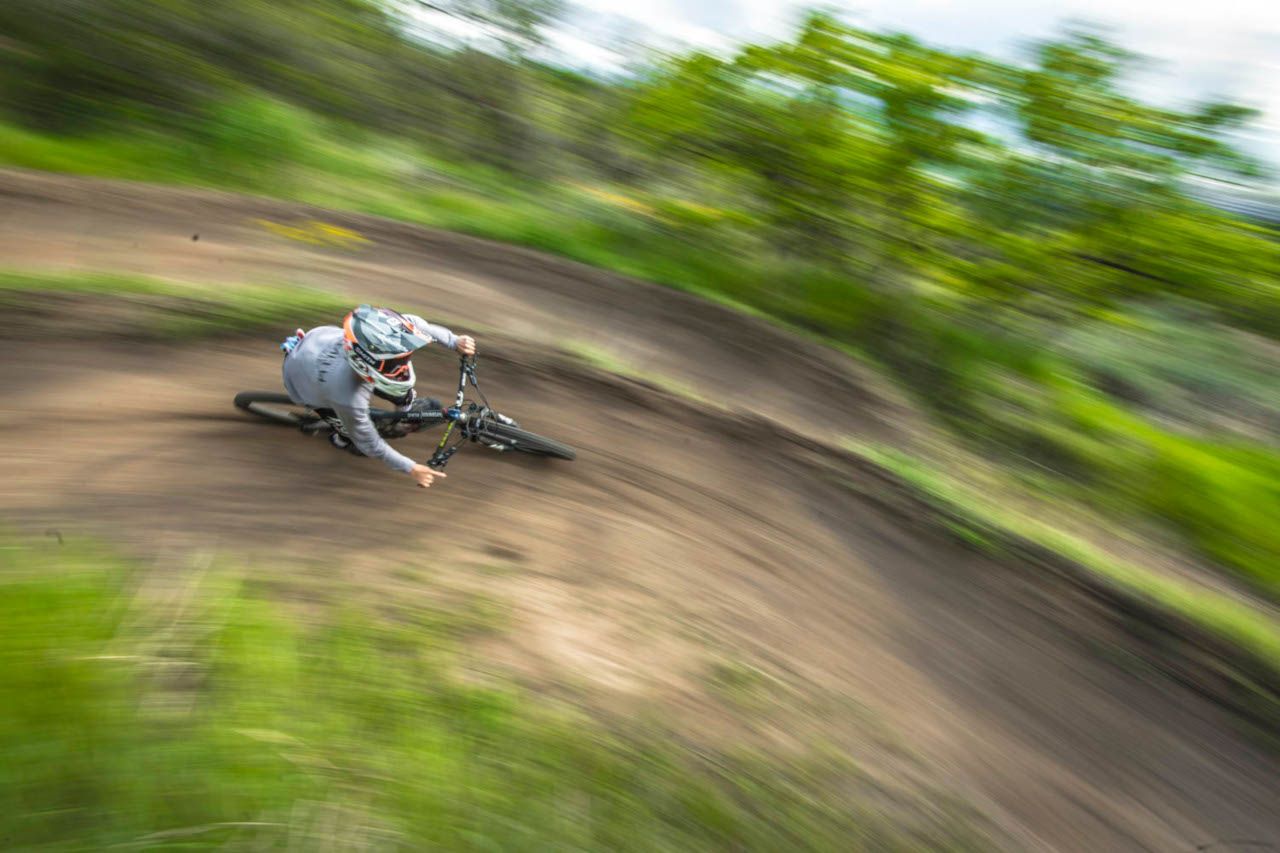
We had a great group of riders to photograph – Giro athlete and pro EWS racer Cody Kelley, local pro and overall wild man James Perri, and my son Julien, a junior downhill and enduro racer. I Street was a perfect venue to show off their skills and as we jumped out of the vehicles, everyone was excited to start shooting and get some ‘banger’ shots.

My Approach
My goal with every workshop I lead is to work on skills development and guide people to expand their creative vision. Since this was a one day workshop, I planned to keep it simple by presenting a few concepts to the group and letting each photographer experiment with their own ideas and creativity from there.
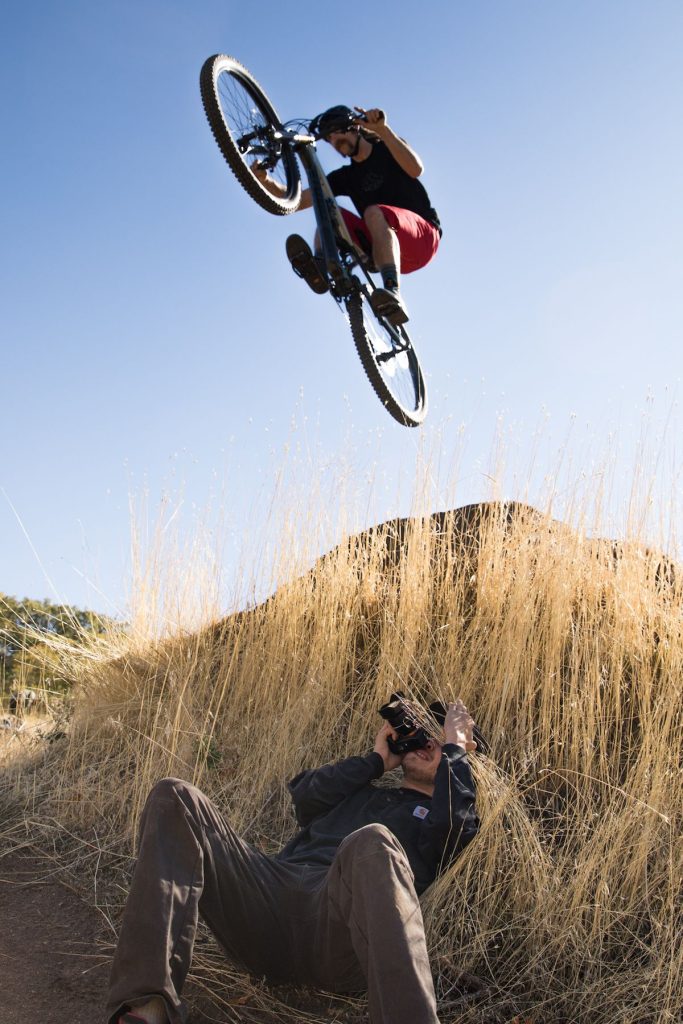


After discussing the plan with the riders and figuring out what tricks they wanted to do, we set up around one jump as the riders cycled through. This allowed everyone to shoot the same jump multiple times, experiment with different angles and lenses, and progressively learn from one shot to the next. When everyone felt that they had the shots they wanted, we set up on another feature, giving the photographers enough time to try out their ideas and get creative with each setup before moving on to the next. Throughout the day I moved around, interacting with the group and giving individual feedback and tips on composition, exposure, lens choices and other subjects we discussed at the beginning of the day.
It was striking to see the group dynamics take hold and watch the photographers interact, share images and talk about their ideas and setups with each other. It created a powerful learning environment where everyone was working together to get great shots and building their knowledge collectively.

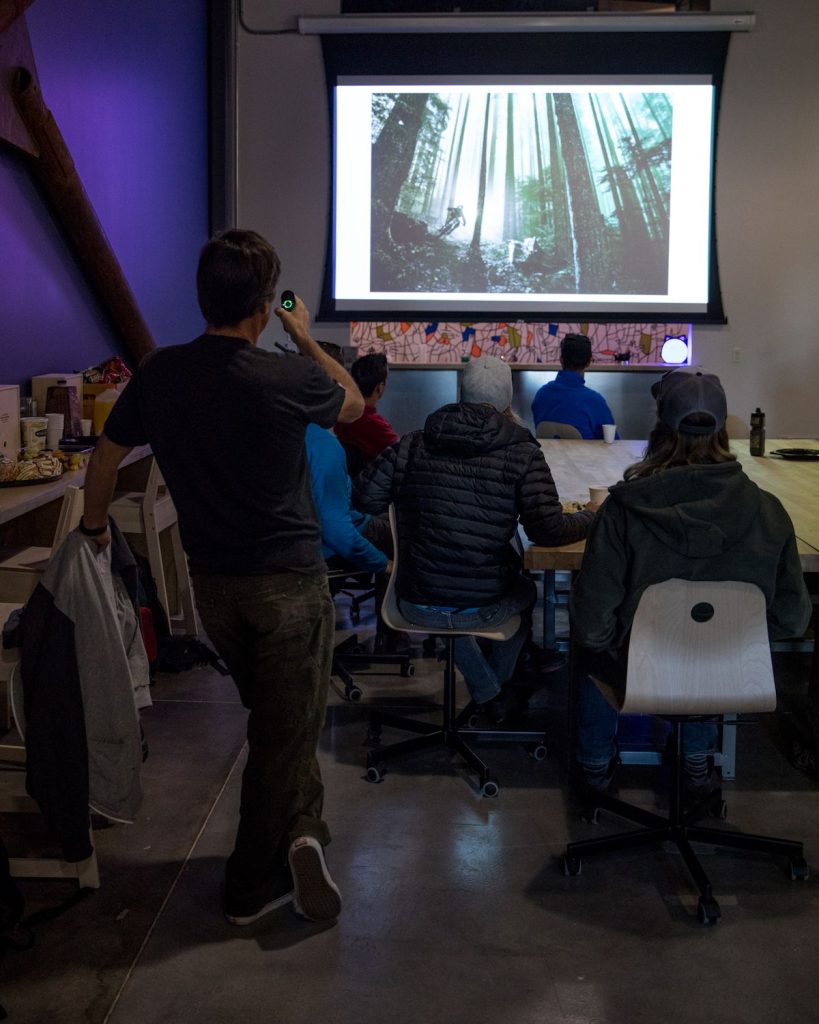
After a few hours of shooting we headed back to the Giro office for lunch, editing and review. I asked the photographers to select and process 5-10 of their favorite shots from the day, and when the images were ready we projected them on a screen for review and critique.
This is my favorite part of every workshop, where everyone sees the results of the days shoot and we analyze the images in detail. It’s a real learning experience to see what worked and what didn’t work in each image and how it relates to the concepts we discussed at the beginning of the day. It was clear from the start that this was a high level group, and I was really impressed with the images that every photographer was able to create.

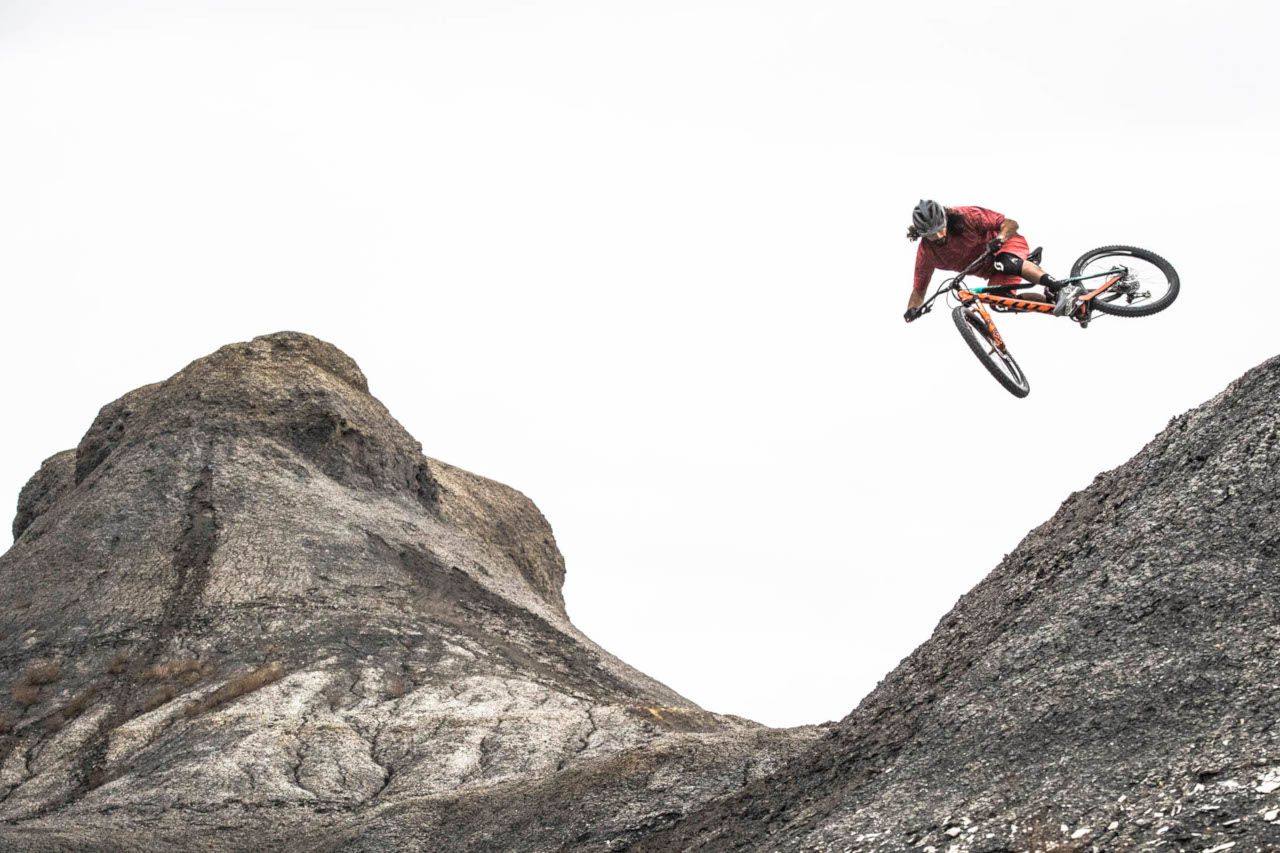
Afterwards, the Giro team and I got together to pick our three favorite images from the day and award prizes to the winners. First place, and an f-stop Lotus pack with a Large Pro ICU went to Avery Stumm (@avery_stumm):

...while David Martinez (@dmartphoto) took second and was awarded an f-stop lens barrel and Giro riding kit for his image:
....and Dylan Cirulis (@cirdylan) took home a Giro riding kit for his third place image:


Discount Applied Successfully!
Your savings have been added to the cart.